Thursday, March 27, 2014
Cookie Cutters
Wednesday, October 31, 2012
Halloween 3D Prints
We made some Halloween themed 3D prints lately. Here's our favorite of the batch, a nice large pumpkin (~4 inches diameter).
I enjoy the dual color capabilities, which allows us to create a part like this with 2 high contrast colors to really make features pop.
Oh, and we also made a few of our favorite spaceship design, using Halloween colors on them.
Wednesday, September 26, 2012
SPACESHIPS
I had fun designing & printing up these little spaceships.
I made these at night, & left them outside my kids doors while they slept. They woke up on an otherwise routine school day to discover these new creations awaiting them.
In the process, I learned how to reliably print multiples at one shot. This way, I can kickoff the process, go run errands, & come back to 20 little toys all at once. I then bring them into school when I pickup the kids, to hand out & spread the awareness of this new tool, along with some toys & joy.
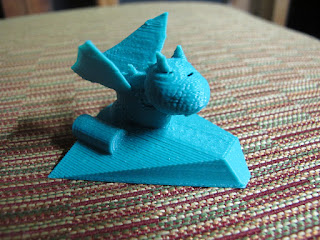
One of my daughter's friends (age 5) suggested we have a dragon ride the spaceship. Great idea! So, I built those the next day & handed him one.
My daughter, so happy to see these new toys come to life so fast.
Sink Drain Adapter for Plunger
A sink was getting clogged up. It was hard to get a plunger around the drain, as the drain was just too close to the sink's wall. The plunger just didn't have enough room to get around that drain!
Here's where I love the MakerBot most. It really opens up the "solution space" to any problem you face.
It's got a spherical bottom, to get flush with the sink bottom. It's got a flat top, to seal against the plunger. And, it has a hole slanted from bottom to top, to move the drain hole further from the wall, where the plunger can get to it.
So, I simply designed, & printed a simple adapter, to move the drain opening out a few inches, to let my plunger do it's work.
IT WORKED! I can now keep this little plastic adapter with the plunger in the garage, for next time the sink gets clogged. It's good to use the MakerBot not just for fun, but to empower yourself to fix things around the house in new ways.
Hook Adapter
My neighbor presented me with this problem: Every year, when he hangs Christmas lights, he buys these little hooks that screw into the rafters to let you hang the lights. But, those hooks are a pain to install. There's no way to just drill them in like a screw.
So, naturally, let's just build an adapter, so you can connect your cordless drill to the hook & install these so much easier.
Here's the prototype. It took a few iterations before I got it to fit right. But, it does in fact let me drill it in.
Now, this plastic 3D printer is great for iterations & prototyping, and this verified the solution. But, we'd never use a plastic drill bit attachment, as it'd fracture at high speed & stress. But, this final plastic prototype could then act as a mold, to then mass produce these in any suitable metal for use & sale.
TinkerToy Adapter for dowels
My wife makes great 3D cake creations. You can see her stuff at http://frazicake.wordpress.com To make the cakes stand up, she needs to use dowels (sticks). But, it's trouble getting those sticks to stand up.
So, I designed & printed some simple adapters to allow the dowels to fit into a shaft just the right size, which can then be screwed into a platform.
The first iteration worked just fine! The fit was snug.
So, now, just copy the design into an array & print a set of 15 in one shot!
Stuck! And, getting unstuck
Doh! The plastic got stuck in the pipes! No more prints for a bit.
You might see some of the red ABS plastic stuck in this part. It's called the "Thermal Barrier" and it fits above the hot nozzles that squirt out the plastic, and below the stepper motors that feed the filament into the nozzle.
Here's a bottom's up view, with the nozzle removed, where you can see the red plastic stuck up in there :(
So, what to do? Take it all apart & soak this in an acetone bath. ABS plastic dissolves in a few hours in acetone, or at least gets soft enough to clean out that gunk easier.
Success! It took patience in taking it apart, cleaning it, reassembling it, and calibrating the sensitive leveling all over again. But, it's worth it to be back on-line & printing again!


