Sunday, February 19, 2017

Student Designs (5th graders)

The best designs from my students in Feb 2017:


It's my pleasure to empower these kids & see their creativity & skills grow so fast!

After teaching 6 sessions using Blender, I've switched to TinkerCAD.

Blender =
    More powerful (mesh-level edits, extrusion)
    Harder to learn
    Requires real computer to install

TinkerCAD =
    Less powerful (missing mesh-level edits)
    Far easier to learn
    Runs on Chromebooks / browser-only
 

Monday, October 17, 2016

Teaching 3D Design to the next generation

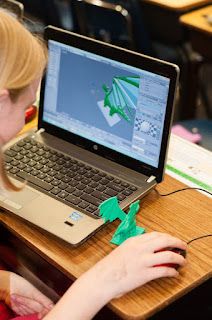
I've taught 7 classes of kids how to do their first 3D Designs.

At the end, each kid gets a real 3D print of their personal design project (which I print in my garage.)

The kids are 5th-7th graders, in nearby schools (both public & private), so I can share my skills & passion with the wider community.

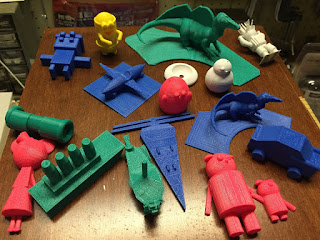
Here are some of their designs.  They designed these after only 5 sessions of 90 minutes each.

Kids are learning machines that humble adults.

I'm so proud of these kids and so happy to be teaching them. So many great designs and so much love!

A minion, dinosaur, plane, ship, minnie-mouse, car, owl, hoverboard, teddy bear, space-ship:


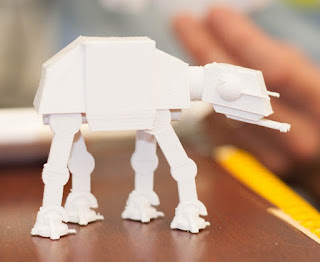
AT-AT (by a 7th grade girl).  Hope Lucas doesn't come after her.  Fair use, I hope?


Designs are done in Blender, the most powerful open-source, free, cross-platform 3D Design tool AFAIK...  Yes, TinkerCAD is getting more popular lately, but it's just not as powerful IMO, & kids can learn either one if given the right support.


If your school wants me to come help, I'd be glad, so long as you're nearby (Santa Clara, CA).
If you want to start a similar program in your school, I can send you the lesson plans that I've evolved through these sessions.


Thursday, March 27, 2014

Cookie Cutters


Cookie Cutters!

My wife wanted to make some cookies for our son's birthday party.  So, I made a custom design in 3D (CAD/blender), & printed it on the MakerBot.  It worked out well.

It's really not too hard.  If you want to know what's involved:

1) Make a bezier curve in CAD, & keep extending it & tweaking it until you think it looks right.  

2) You can often bring external 2D art from google searches into your CAD program, & then draw your 3D stuff right on top. (Tracing as a shortcut!)

3) Then, extrude your curve to give it depth for cutting

4) Add a rim for hands to press against, which also gives the piece more structural integrity.  Leave a hole in the center to let the baker push the dough out from the cutter.

Wednesday, October 31, 2012

Halloween 3D Prints

We made some Halloween themed 3D prints lately. Here's our favorite of the batch, a nice large pumpkin (~4 inches diameter).

I enjoy the dual color capabilities, which allows us to create a part like this with 2 high contrast colors to really make features pop.

Oh, and we also made a few of our favorite spaceship design, using Halloween colors on them.

Wednesday, September 26, 2012

SPACESHIPS

I had fun designing & printing up these little spaceships.

I made these at night, & left them outside my kids doors while they slept. They woke up on an otherwise routine school day to discover these new creations awaiting them.

In the process, I learned how to reliably print multiples at one shot. This way, I can kickoff the process, go run errands, & come back to 20 little toys all at once. I then bring them into school when I pickup the kids, to hand out & spread the awareness of this new tool, along with some toys & joy.

One of my daughter's friends (age 5) suggested we have a dragon ride the spaceship. Great idea! So, I built those the next day & handed him one.

My daughter, so happy to see these new toys come to life so fast.

Sink Drain Adapter for Plunger

A sink was getting clogged up. It was hard to get a plunger around the drain, as the drain was just too close to the sink's wall. The plunger just didn't have enough room to get around that drain!

Here's where I love the MakerBot most. It really opens up the "solution space" to any problem you face.

It's got a spherical bottom, to get flush with the sink bottom. It's got a flat top, to seal against the plunger. And, it has a hole slanted from bottom to top, to move the drain hole further from the wall, where the plunger can get to it.

So, I simply designed, & printed a simple adapter, to move the drain opening out a few inches, to let my plunger do it's work.

IT WORKED! I can now keep this little plastic adapter with the plunger in the garage, for next time the sink gets clogged. It's good to use the MakerBot not just for fun, but to empower yourself to fix things around the house in new ways.

Hook Adapter

My neighbor presented me with this problem: Every year, when he hangs Christmas lights, he buys these little hooks that screw into the rafters to let you hang the lights. But, those hooks are a pain to install. There's no way to just drill them in like a screw.

So, naturally, let's just build an adapter, so you can connect your cordless drill to the hook & install these so much easier.

Here's the prototype. It took a few iterations before I got it to fit right. But, it does in fact let me drill it in.

Now, this plastic 3D printer is great for iterations & prototyping, and this verified the solution. But, we'd never use a plastic drill bit attachment, as it'd fracture at high speed & stress. But, this final plastic prototype could then act as a mold, to then mass produce these in any suitable metal for use & sale.