Wednesday, September 26, 2012

SPACESHIPS

I had fun designing & printing up these little spaceships.

I made these at night, & left them outside my kids doors while they slept. They woke up on an otherwise routine school day to discover these new creations awaiting them.

In the process, I learned how to reliably print multiples at one shot. This way, I can kickoff the process, go run errands, & come back to 20 little toys all at once. I then bring them into school when I pickup the kids, to hand out & spread the awareness of this new tool, along with some toys & joy.

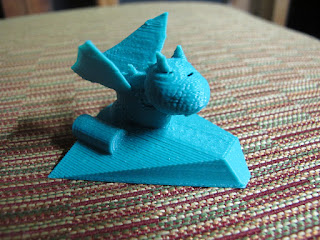
One of my daughter's friends (age 5) suggested we have a dragon ride the spaceship. Great idea! So, I built those the next day & handed him one.

My daughter, so happy to see these new toys come to life so fast.

Sink Drain Adapter for Plunger

A sink was getting clogged up. It was hard to get a plunger around the drain, as the drain was just too close to the sink's wall. The plunger just didn't have enough room to get around that drain!

Here's where I love the MakerBot most. It really opens up the "solution space" to any problem you face.

It's got a spherical bottom, to get flush with the sink bottom. It's got a flat top, to seal against the plunger. And, it has a hole slanted from bottom to top, to move the drain hole further from the wall, where the plunger can get to it.

So, I simply designed, & printed a simple adapter, to move the drain opening out a few inches, to let my plunger do it's work.

IT WORKED! I can now keep this little plastic adapter with the plunger in the garage, for next time the sink gets clogged. It's good to use the MakerBot not just for fun, but to empower yourself to fix things around the house in new ways.

Hook Adapter

My neighbor presented me with this problem: Every year, when he hangs Christmas lights, he buys these little hooks that screw into the rafters to let you hang the lights. But, those hooks are a pain to install. There's no way to just drill them in like a screw.

So, naturally, let's just build an adapter, so you can connect your cordless drill to the hook & install these so much easier.

Here's the prototype. It took a few iterations before I got it to fit right. But, it does in fact let me drill it in.

Now, this plastic 3D printer is great for iterations & prototyping, and this verified the solution. But, we'd never use a plastic drill bit attachment, as it'd fracture at high speed & stress. But, this final plastic prototype could then act as a mold, to then mass produce these in any suitable metal for use & sale.

TinkerToy Adapter for dowels

My wife makes great 3D cake creations. You can see her stuff at http://frazicake.wordpress.com To make the cakes stand up, she needs to use dowels (sticks). But, it's trouble getting those sticks to stand up.

So, I designed & printed some simple adapters to allow the dowels to fit into a shaft just the right size, which can then be screwed into a platform.

The first iteration worked just fine! The fit was snug.

So, now, just copy the design into an array & print a set of 15 in one shot!

Stuck! And, getting unstuck

Doh! The plastic got stuck in the pipes! No more prints for a bit.

You might see some of the red ABS plastic stuck in this part. It's called the "Thermal Barrier" and it fits above the hot nozzles that squirt out the plastic, and below the stepper motors that feed the filament into the nozzle.

Here's a bottom's up view, with the nozzle removed, where you can see the red plastic stuck up in there :(

So, what to do? Take it all apart & soak this in an acetone bath. ABS plastic dissolves in a few hours in acetone, or at least gets soft enough to clean out that gunk easier.

Success! It took patience in taking it apart, cleaning it, reassembling it, and calibrating the sensitive leveling all over again. But, it's worth it to be back on-line & printing again!

Thursday, September 6, 2012

Board Game Pieces, custom/personalized

Here we are, happily playing with our new custom, personalized, "makerbot printed", board game pieces in my son's latest favorite game (Star Wars Monopoly).

My son made a custom token with lots of "Win", his name, & cones/spheres to use to dominate the next games.

My daughter saw that, & of course, had to request that her brother also make one for her, but smaller, &, with her name, & lots of "win" "win" "win" on it.

I printed a simple spiral using the golden ratio / fibonacci sequence. If you haven't seen Donal Duck's Mathematics by Disney, I highly recommend you pull up your kids & spend 8 minutes here: http://www.youtube.com/watch?v=YVODhFLe0mw.

For those curious about MakerBot limitations, notice how the bottom is peeling off the platform. This is caused by cooling/contraction of the bottom as the top, hot printing still is ongoing. This is in spite of the ABS+acetone bonding layer which you can see, is still trying (unsuccessfully) to pull the bottom down, leaving strands.

Lil' Dude

Just a little dude, just because, why not.

Here's the lil' dude with his dragon friends.

Dragon Evolution

The first dragon came out "ok" for 20 minutes worth of design by an engineer who's a very lousy artist.

Here's the 2nd iteration of the dragon, a bit better.

It's nice to see it as it prints, building one layer at a time. As it builds the wings, it almost looks like it's tickling the part as it prints it.

Here's the latest lil' dragon, with spikes on his back, feet to keep him standing up, and a new color!

Spaghetti Problems!

Sadly, this is very common.

We intend to print a nice part, but it ends up looking like spaghetti!

What happens is, if the bottom of the part slips from the position on the platform, the printing on top will just print into open space, and string along the plastic like spaghetti.

Every mistake is an opportunity to learn, and we're doing lots of this mistake+learn here with the MakerBot.

What we've found works well to avoid this spaghetti is:

  • Ensure the platform is level & close to the tips. Calibrated the platform every day, and do it hot (as cold/hot have different positions, & it prints hot, so you must calibrate hot)
  • Once the platform is close, then, use ABS+acetone in a slurry, and apply a little of this to the platform to create a more adhesive bonding layer to prevent new parts from moving while printing
  • Print a "raft" or other wider bottom material in your design, so that it has a wider base, which is inherently much more stable to prevent motion later in the print

The Tower, rev 2

"The Tower", revision 2

My son continues to learn the power of iterative design. (Imagine, design, build, evaluate/learn, redesign). And, we love how the MakerBot shortens the iteration from weeks to hours. Here, he designed a more complex "tower" for his monopoly upgrades.

Here he is, excited & proud to see it getting built.

Here he is, happy with the results, showing the design & him holding the physical part

800 Birds is a silly name, I know, but it's my favorite mini-conference, where Silicon Valley startup geeks meet up to trade ideas, learn from each other, & have fun. Shirley Lin is the facilitator & the best networking catalyst I've ever worked with. So, I made this little medal for her & the group.